

Micro:bits - Superposition and Entanglement
Micro:bits - Superposition and Entanglement Downloadable PDF
Overview:
In Part 1 of this activity, students will observe the concept of superposition through a demonstration using a preprogrammed Micro:bit representing a quantum bit, or qubit.
In Part 2 of this activity, students will observe the concept of entanglement through interaction with two “entangled” Micro:bit “qubits”.
In the Extension, students can experiment with reprogramming Micro:bits to demonstrate another example of entanglement.
Materials:
- Two pre-programmed Micro:bits (see code below) - it is recommended to label qubits
differently so it is always clear which one you are using. Small stickers work well.
- Qubit 1
- Qubit 2
- Micro:bit accessories (includes USB cords (2), battery packs (2), batteries (2), instruction booklet (1))
Preparation:
This activity introduces unique quantum properties, but it also references how those
properties can be used in Quantum Computing. In this activity, the Micro:bits each
represent a qubit (or a quantum bit).
|
Qubit: The basic unit of information used in Quantum Computing - the quantum equivalent of a bit in our current computers. |
Other vocabulary introduced in this activity includes:
|
Superposition: The fundamental principle that a physical system can exist in a combination of multiple states or configurations simultaneously. |
|
Entanglement: A quantum physics phenomenon where two or more particles become inextricably linked. |
Insert batteries into two battery packs. Plugging the battery packs into the Micro:bits will start the program. Complete the demo once yourself to be sure that the Micro:bits are still programmed correctly. If they are not, you can navigate to MakeCode, create an account, and then download the following to your Micro:bit:
- Qubit 1 Superposition link: https://makecode.microbit.org/S03283-90853-58327-55917
- Qubit 2 Entanglement link: https://makecode.microbit.org/S62868-27611-81918-95883
Disconnect the battery packs again before starting the demo with the students.
Directions:
Part 1 - Superposition:
- Give one student the Qubit 1 Micro:bit that is coded for “superposition” and a battery pack.
- Ask the student to plug in the Micro:bit, this should cause the red lights on the
front of the Micro:bit to “spin” around in a circle. This models how qubits are in
a state of superposition and are a combination of different states (instead of 0 or
1, the spinning lights represent 0 to 1 and everything inbetween). The figure below shows a Bloch sphere diagram which can help students visualize how
qubits can exist in a state that is beyond the classical binary states of “0” or
“1”.
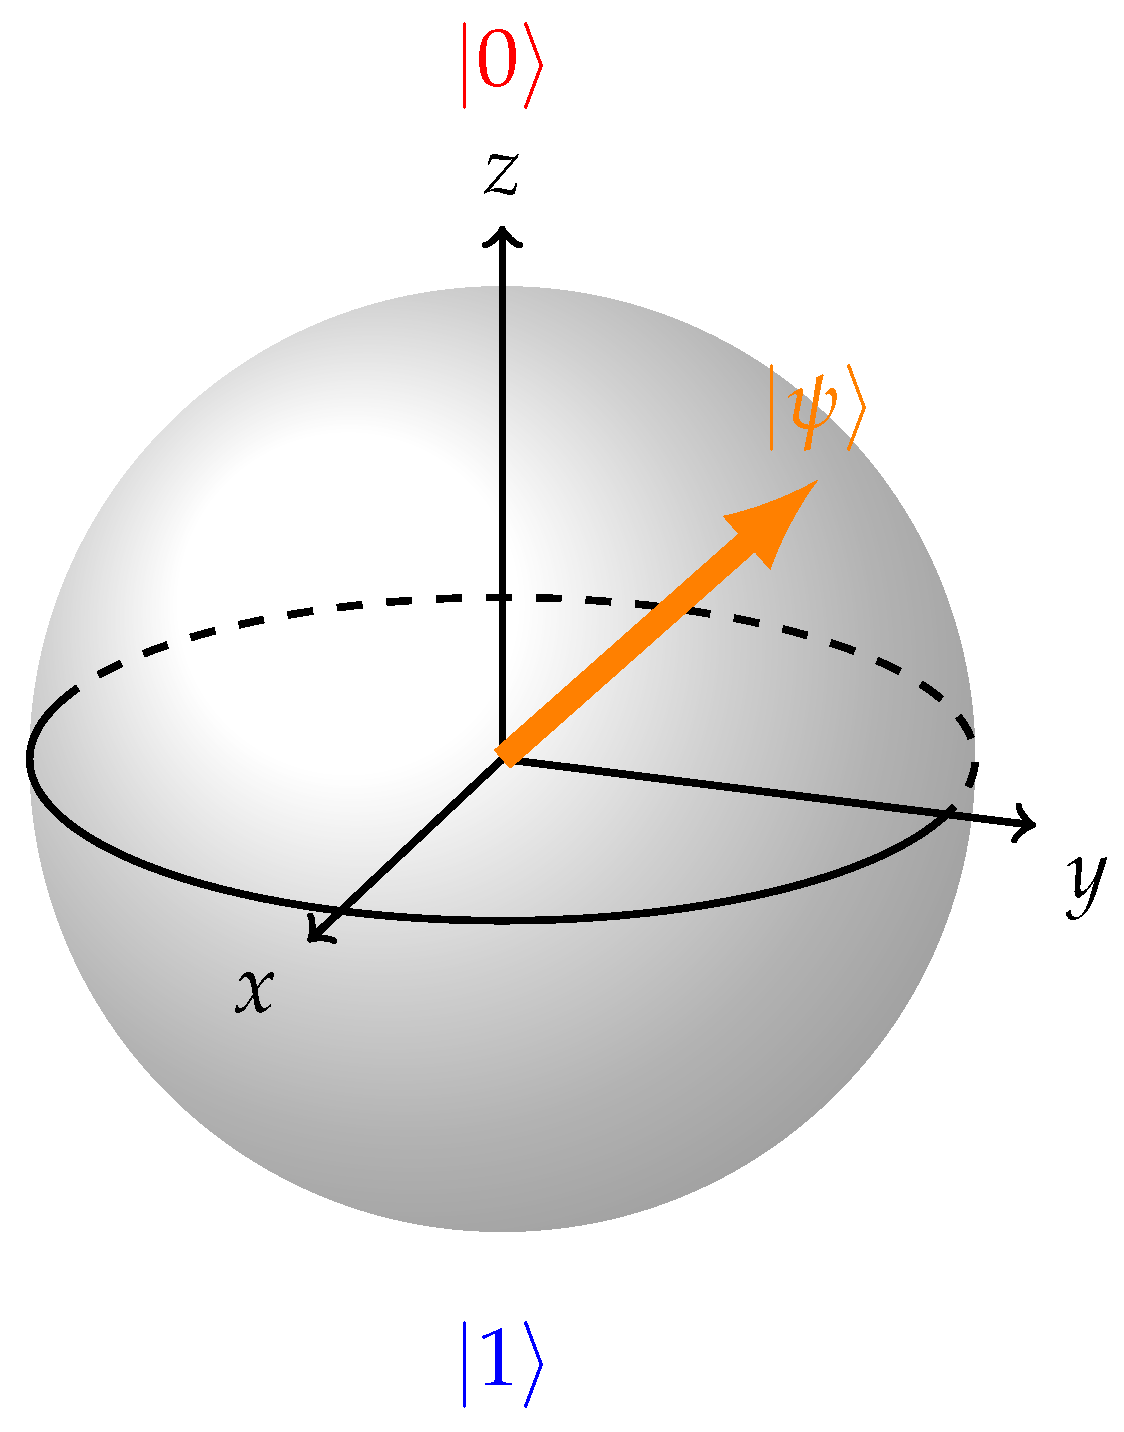
Source: Filatov, S., & Auzinsh, M. (2024). Towards Two Bloch Sphere Representation of Pure Two-Qubit States and Unitaries. Entropy, 26(4), 280. https://doi.org/10.3390/e26040280 - Explain that when you measure a qubit that is in the state of superposition it “collapses” into either a 0 or a 1. It is in the quantum state of superposition only until it is measured, at which point it becomes a 0 or a 1 like a classical bit.
-
Instruct the student with qubit 1 to press the A button on their Micro:bit while the class observes what happens. This is like taking a measurement of the qubit. Students should observe a 0 or a 1 instead of the superposition state on the Micro:bit.
Part 2 - Entanglement:
- Give a second student the qubit 2 Micro:bit that is coded for “entanglement”.
- To get the qubit 1 Micro:bit back into superposition, ask the student to press the B button.
- Ask the student to plug in the second (qubit 2) Micro:bit, this should cause the Micro:bit representing the second qubit to “spin” around in a circle.
- It is important to note to students that both Micro:bits are in a state of superposition when they get turned on. This is a necessary state before entanglement can occur.
- Ask students to position themselves so that their classmates can see both qubits, but the two volunteers can’t see each other’s qubit, if possible.
- Ask ONLY the student with the qubit 1 to press the A button (to measure the value of the qubit). Be sure to have the class look at BOTH Micro:bits. The class should notice qubit 2 Micro:bit changes at the same time qubit one is measured. This is because the qubits have been entangled, which means that once one qubit is measured, we know the state of the second qubit.
Explaining the Science:
Superposition and entanglement are two important properties of qubits that help to make quantum computers both more secure and faster than classical computers. One way to think about this is to imagine how a “classical” (current) computer finds the correct path through a maze. It tries one path or option at a time. A Quantum computer tries all the paths at once so it finds the correct path faster, as this Quantum Maze animation demonstrates.
Extensions:
If you’d like to look at the Micro:bit coding and do an extension activity that changes the entangled qubit code to have a different behavior, check out the next two sections. However, if you’d like to stop at this point you can.
Recode for Opposite Entanglement
If your students have never used MakeCode to program micro:bits, this extension activity gives them a chance to modify a pre-written program. A reason that entanglement is helpful to Quantum Computing is that with two entangled qubits, the state of both qubits is known after only observing the state of one. This Micro:bit code is programmed to have the same value when entangled. However, entangled qubits can also have opposite values. For that type of entanglement, when the state of one qubit is measured, it is known that the state of the other is the opposite. In this extension activity, students will reprogram the micro:bit to change the behavior of the entangled qubit.
Materials:
- Two pre-programmed Micro:bits - it is recommended to label qubits differently so it
is always clear which one you are using. Small stickers work well.
- Qubit 1
- Qubit 2
- Micro:bit accessories (includes USB cords (2), battery packs (2), batteries (2), instruction booklet (1))
- A copy of the entanglement code opened in MakeCode, open it to edit. Make a copy to
create so you have an un-edited copy available to undo any edits if necessary.
- Qubit 2 Entanglement link: https://makecode.microbit.org/S62868-27611-81918-95883
Preparation:
- Go over the MakeCode program and the MakeCode logic section (below) with the class.
Directions:
- Explain that qubits can also be entangled to have opposite measured values.
- After going through the code logic step-by-step with the class, have the students go through the code and logic to identify where this change can be made. (Hint to give: There are different ways this change can be made! One, straightforward place to make this change is in the “entanglement” code in the on radio received “name” “value” function block. This can be done by swapping the images in the “show leds” blocks.)
- Have the students make code changes and upload their code for qubit 2 (do not change the code for qubit 1). For instructions on how to do that, you can look here: https://microbit.org/get-started/user-guide/transfer-code-to-the-microbit/
- Go through Part 2 - Entanglement activity again. If coded correctly, this time the entangled qubits should have opposite measured values.
MakeCode Logic:
This section goes over, line-by-line, how the Micro:bits can be programmed to simulate qubits using MakeCode and is meant to be read alongside the code. The code for these programs is linked in the previous section.
“Superposition” qubit (qubit 1)on start :runs when the micro:bit is turned on/started up. -“radio set group ‘1’”: -This line occurs in the code for both qubits because we initialize them to be in the same radio group. In the context of micro:bits, this means that they communicate on the same radio channel. For the purpose of this activity, we make use of this feature to “entangle” our qubits but note that real qubits do not communicate like this. -“set measuring to ‘0’”: -This line is how we set the qubit to an unobserved/default/unmeasured state of superposition. When the qubit IS being measured or observed, then this variable takes on a value of “1”-- we will get to what this means with respect to the code later. -“set ‘superposition_sequence’ to ‘........’”: -This block defines a “superposition_sequence” of images that get displayed on the micro:bit’s LED array. Together, these images create a “spinning” visual on the micro:bit LED screen, which is how we represent the “superposition” property. We do this visualization to show that, when in superposition, the qubit can “be” in any position between “0” (LED lit at the bottom of the array) and “1”(LED lit at the top of the array). forever: represents a loop that runs “forever” or at least when the micro:bit is “on” -“for element ‘state’ in ‘superposition_sequence, do”: -This block loops through each individual image or state of the “spinning” superposition visual. -“if ‘measuring’ = ‘0’ then”: -Checks if the qubit is in a state of superposition. -“show image ‘state’ at offset ‘0’” : -In the case that the qubit is in a state of superposition, then display the image on the micro:bit’s LED screen. Offset ‘0’ means that the image is displayed as is on the LED screen. -“else if ‘measuring’ = ‘1’ then”: -Checks if the qubit is being measured. -“break” -In the case that the qubit is being measured, the program breaks out of the “spinning” superposition image display loop. on button “A” pressed:this is how to “measure” the superposition qubit’s state -“set ‘measuring’ to ‘1’”: -Updates the variable that represents whether the qubit is in a state of being observed. This update breaks the qubit out of superposition, stopping the spinning, superposition display sequence in the forever loop. -“set ‘Number’ to pick random ‘0’ to ‘1’”: -Randomly picks the measured value of the qubit to be either “0” or “1”. -“radio send ‘value’ “value” = ‘Number’”: -This line sends the measured value (0 or 1) of this qubit to entangled “entanglement” qubits in the same radio group. This radio message can also be read as “this qubit has a measured “value” of 0 (or 1).” -“if ‘Number’ = ‘1’ then”: -Checks if the qubit has a measured/observed value of 1. -“show leds”: -Shows an image on the qubit that shows it with a measured value of 1 (single lit LED at the top of the screen). -“else if ‘Number’ = ‘0’ then”: -Checks if the qubit has a measured/observed value of 0. -“show leds”: -Shows an image on the qubit that shows it with a measured value of 0 (single lit LED at the bottom of the screen). on button “B” pressed: this puts the qubit back into superposition -“radio send value ‘measure’ = ‘0’”: -This line sends the message to entangled qubits in the same radio group that this qubit is no longer in a state of being measured, directing them to set their “measuring” variables back to “0”. -“set ‘measuring’ to ‘0’”: -Takes the qubit out of a state of being measured/observed and back into a state of superposition. This re-starts the display of the “spinning” superposition sequence in the forever loop. on “shake”: this puts the qubit back into superposition -Has the same code as the “on button ‘B’ pressed” function, see above. |
“Entanglement” qubit (qubit 2):on start: Same as the “on start” function in the “Superposition” code. See description above. Forever: Same as the “forever” function in the “Superposition” code. See description above. on radio received “name” “value”: -“if ‘name’ = ‘value’ then”: -This is the case where the entangled qubit is sending a message with its measured “value” to this qubit. -“set ‘measuring’ to ‘1’”: -Updates the variable that represents whether the qubit is in a state of being observed. This update breaks the qubit out of superposition, stopping the spinning, superposition display sequence in the forever loop. -“if ‘value’ = ‘0’ then”: -Checks if the qubit has a measured/observed value of 0. -“show leds”: -Shows an image on the qubit that shows it with a measured value of 0 (single lit LED at the bottom of the screen). -“else if ‘value’ = ‘1’ then”: -Checks if the qubit has a measured/observed value of 1. -“show leds”: -Shows an image on the qubit that shows it with a measured value of 1 (single lit LED at the top of the screen). -“else if ‘name’ = ‘measure’ then”: -This is the case where the entangled qubit is telling this qubit that it is no longer in a state of being “measured. -“set ‘measuring’ to ‘0’”: -Takes the qubit out of a state of being measured/observed and back into a state of superposition. This re-starts the display of the “spinning” superposition sequence in the forever loop. |
Standards Supported By This Activity:
| Standard Code | Standard Text | How does this activity support this standard? |
|
Montana Technology Integration Content Standard TI.DC.3.2 |
demonstrate appropriate use of devices | This activity requires students to use and interact with devices. |
|
Montana Computer Science Content Standard CS.AP.5.4 |
Modify, remix, or incorporate portions of an existing program to develop something new or add more advanced features. | The extension activity supports this standard because the students modify the code to produce a different outcome. |
| QIS Key Concepts for Middle School Framework (National Q-12 Education Partnership) |
MS Science 2.1 Quantum State QIS Learning Outcome(s) Students will be able to explain that quantum states may have indefinite (probabilistic) outcomes, meaning that the outcomes are not determined until they are measured, if they are in a superposition of different possibilities. |
Part 1 of this activity demonstrates the concept of superposition, or quantum states with indefinite outcomes. |
|
MS Computer Science 4.1 Qubits QIS Learning Outcome(s) Students will describe how systems which obey the laws of quantum mechanics can store information as quantum bits. |
In this activity, students are introduced to the concept of qubits, or quantum bits, as opposed to bits used for coding “classical” computers. | |
|
MS Computer Science 4.2 Qubits QIS Learning Outcome(s) Students will explain how quantum bits store more information than classical bits. |
In this activity, students are introduced to the concept of qubits, or quantum bits, as opposed to bits used for coding “classical” computers. | |
|
MS Mathematics 5.1 Entanglement QIS Learning Outcome(s) Students will describe how when multiple qubits in superposition are not entangled, their measurement outcomes are independent. |
In Part 1 of this activity, students see a demonstration of how one qubit that is not entangled collapses when measured. | |
|
MS Mathematics 5.2 Entanglement QIS Learning Outcome(s) Students will understand that when multiple qubits in superposition are entangled, their measurement outcomes are correlated. |
In Part 2 of this activity students see a demonstration of how two entangled qubits have correlated outcomes when measured. |
This resource was provided by the MSU Science Math Resource Center using resources from QCORE with support from the Air Force Research Laboratory under Contract No. FA8750-25-C-B027. Any opinions, findings and conclusions or recommendations expressed in this material are those of the author(s) and do not necessarily reflect the views of the Air Force Research Laboratory. This activity was created by the Montana State University Science Math Resource Center.
412 Reid Hall • smrc@montana.edu